9.21.2012

Anchor Down

James Franklin came to Vanderbilt to bring a new energy to football. It's working. His energy is contagious.
In last weeks' New York Times article, it indicated that he came up with a slogan "Anchor Down".
So here's our interpretation and I see many more variations to come.
It is a freezer paper template that I found via pinterest and the blog, Ruffles and Stuff;  http://www.rufflesandstuff.com/2012/04/freezer-paper-tutorial-better-late-than.html
Go Dores!
Anchor Down!
End result
About to paint over stencil

6.25.2012

Sew Close

If I weren't so picky and didn't have one I am trying to copy- I'd sew up the seams, stick in some elastic and be done. But I like the details of a lining, elastic on the back but flat front on the waist.
I finished one last night and am so close to being done with this one. Figured the post will keep me accountable for a finished product and maybe a tutorial if I can find my notes.

6.20.2012

Life Ring!

Last summer I had the brilliant idea of making a laminated card ring with my kids schedules, info, contacts, addresses and more for our new babysitter. After spending time over and over explaining where, how and when every summer, I realized I could save myself some time and not make her call me every time she needed information. Or rather, text! Win win. Life ring!
1. Create a blank word document.
2. Set margins to 0.0
3. Add a text box, right click to format box. Add backgrounds, change colors, create a thick line...
4. Import a photo, format with a line arm round it.
5. Do four to a page. I copy and paste the first one and then edit.
You can spend a lot of time on the editing but it fun to see what you can come up with!
6. Print on presentation paper ( what I typically use for kids projects, ad its not glossy)
7. Take to kinks, laminate, cut, hole punch and add the ring!

5.27.2012

It's in the bag

The girls love having different bags for various occasions (quite similar to their mom) ad I've discovered some great tutorials on Pinterest.
Made one for my daughter's book buddy in Pre-K...they love these. Must make more!

5.06.2012

Curtain Call

Bi-fold closet doors for boys are not cool. They fall off the track without even trying and if extra effort is required, why use them?
So when I spied a fabric sale off the side if the road in Belle Meade- I instinctively knew I might find something for who knows what purpose.
And one project down, personalized closet curtains.
One pair of Ikea khaki drapes, gold wool felt (the sale), black felt, steam n' seam and thread.
Voila- curtains they like, and use!

4.24.2012

Oh Baby


Co-hosting a baby shower with a group of ladies this week and got inspired by Dana (Dana Made It) with burp cloths and a cute seersucker dress. And done before mid-night!
Baby pillowcase dress tutorial
Burp cloth tutorial

3.07.2012

Spring Fever

The sewing machine has been calling my name and this project has been on my to do list for ever.
I did my best to replicate my favorite girls skirt from Hilly Chrisp.
Will take photos on round two and attempt a tutorial.
Ordering striped grosgrain for the final touches and a twirlin' we go!

2.26.2012

It's a wrap!

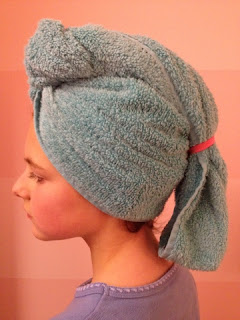
Long ago I had a microfiber hair towel that is ideal for post showered hair and, the towel stayed put. Thanks to a fellow blogger I found a great hair wrap tutorial on Skip to my Lou.

http://www.skiptomylou.org/2008/09/04/towel-wrap-for-your-hair/

I adjusted the size for my 9 year old daughter who likes to wrap her hair while she dresses after her shower and snuggles in bed to read a book. (And, avoid the mom with the hair dryer!)

20 minutes max- we will be making more of these.
I used a $4 towel from Target so this is a very inexpensive alternative to the $20 hair wraps...turns out smaller towel wraps will make two but on the second I didn't have a finished edge so I made my own.
Brooke's hair wrap
Jane's wrap and her favorite towel

 
I drew the pattern with a washable marker. Now I know that it could have been smaller for a child's size. These measurements are on the tutorial.
 
After cutting, this started as 36" for for my daughter, it only needed to be 28-30" across and about 4" less tall from the left.
I have yards of the hairband elastic which I cut to 7" but could have just been 5"

And my favorite part, the serger. Less than a minute and the finishing edges are done. Thank you Jessica our babysitter who went to fashion design school and loaned me this and gave me some great tips. I need one of these.